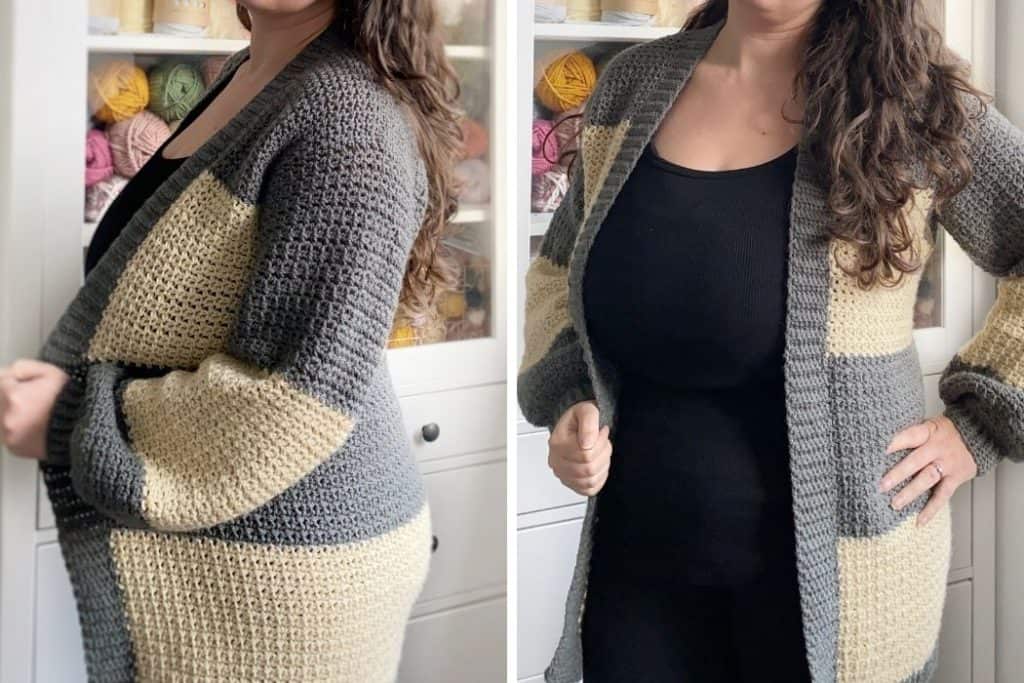
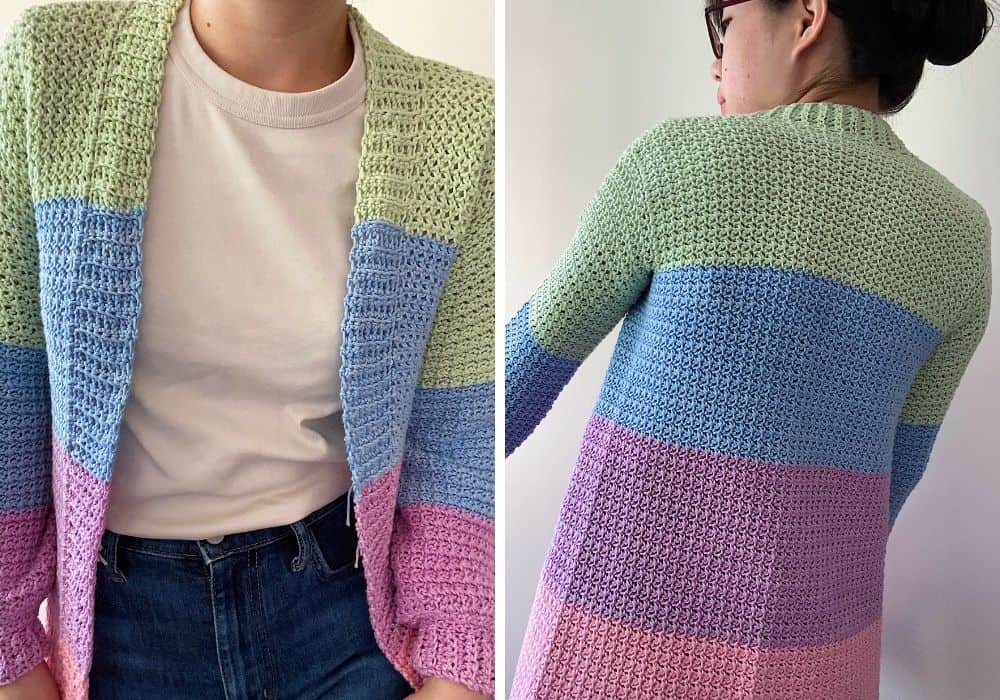
The Magnolia cardi is a free, long striped crochet cardigan pattern with a simple, classic style and slouchy fit to be extra comfy! Throw on with jeans or leggings for an effortless but cozy look. In DK yarn it has plenty of drape and isn’t too heavy with the longer length.
The length and colour block stripes can be adjusted for any style or colours, or even make yours in one solid colour.
The pattern is beginner friendly and an easy place to start with garments. The whole body is made in one piece with a single row repeat so you can pay minimal attention – perfect!

The pattern is designed for an oversized fit and lots of room in the sleeves with no restriction. The sample I made for myself is more fitted than i’d like as i’m a few weeks post partum in these pictures so expect a bigger fit than shown, but the size guide will let you pick the right fit for you.
This post contains affiliate links, meaning I may make a commission if you purchase through a link, at no additional cost to you.
More Cardigan Crochet Patterns


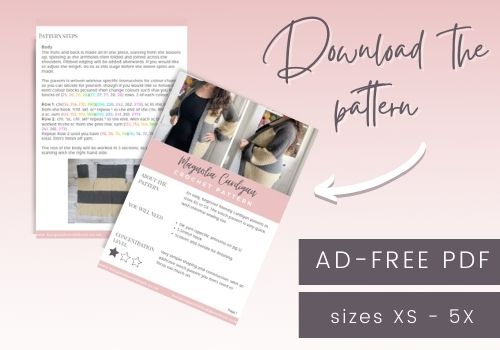
You can get the ad-free downloadable PDF from your favourite pattern store below.


Free Long Striped Crochet Cardigan Pattern
What you need to crochet the Magnolia cardigan
- DK yarn (specific amounts in size guide below)
- 5.5mm/I hook
- Scissors and needle for finishing
I used Stylecraft Special DK in graphite and cream. The pattern has also been completed in;
Deramores Studio DK
We Love Yarn Mega Ball
Hobby Amigo
Lion brand comfy cotton blend
Stitch Terms & Abbreviations
Pattern is written in US terms
Chain – ch
Slip Stitch – sl st
Stitch(es) – st(s)
Skip – sk
Single Crochet – sc
Gauge
In 4×4″: 16 rows of 18 stitches
Gauge square pattern:
Row 1: *sc, ch1, sk1* repeat
Row 2: sc in each sc, ch1 and sk1 over each ch1 from the previous row
Ch1 does count as a stitch
Notes
- Stitch counts will be in brackets at the end of each row in the format (XS, S, M, L)(XL, 2X, 3X, 4X, 5X)
- Starting chs do not count as a stitch, the chs made as part of the stitch pattern do count as a stitch
- Pattern is worked flat in rows, with a turn at the end of every row
Size Guide & Yardage
The pattern is written for a looser fit with 4″ of positive ease and sitting below hip length. Size down for a more fitted or true to size cardigan.
Size — bust in “ — yards — grams
XS — 30 — 1331 — 412
S — 34 — 1502 — 464
M — 38 — 1629 — 504
L — 42 — 1771 — 548
XL — 46 — 1942 — 601
2X — 50 — 2091 — 647
3X — 54 — 2222 — 688
4X — 58 — 2428 — 752
5X — 62 — 2563 — 794
Long Striped Crochet Cardigan Pattern
Body
The front and back is made all in one piece, starting from the bottom up, splitting at the armholes then folded and joined across the shoulders. Ribbed edging will be added afterwards. If you would like to adjust the length, do so at this stage before the sleeve splits are made.
The pattern is written without specific instructions for colour changes so you can decide for yourself, though if you would like to follow the even colour blocks pictured then change colours such that you have 4 blocks of (25, 26, 26, 26)(27, 27, 27, 28, 28) rows, 2 of each colour.
Row 1: ch(134, 154, 170, 190)(206, 226, 242, 262, 278), sc in the 2nd ch from the hook, *ch1, sk1, sc* repeat * to the end of the chs, finishing on a sc, turn (133, 153, 169, 189)(205, 225, 241, 261, 277)
Row 2: ch1, *sc, ch1, sk1* repeat * to the end, with each sc being worked in the sc from the prev row, turn (133, 153, 169, 189)(205, 225, 241, 261, 277)
Repeat Row 2 until you have (76, 78, 76, 74)(76, 74, 72, 74, 72) rows in total. Don’t finish off yarn.
The rest of the body will be worked in 3 sections as below.

Right Side Section
Row 1: ch1, sc, *ch1, sk1, sc* repeat * until you have (23, 29, 33, 37)(41, 47, 51, 55, 59) sts, starting and finishing on a sc, turn
Row 2: ch1, *sc, ch1, sk1* repeat * to the end, with each sc being worked in the sc from the prev row, turn (23, 29, 33, 37)(41, 47, 51, 55, 59)
Repeat Row 2 until you have (24, 26, 28, 30)(32, 34, 36, 38, 40) rows for this section, and (100, 104, 104, 104)(108, 108, 108, 112, 112) rows in total. Fasten off.
Back/Middle Section
Row 1: Starting from the right side, count across 11 sts (for all sizes) and join yarn into the 12th st with a sc. *ch1, sk1, sc* repeat * until you have (65, 73, 81, 93)(101, 109, 117, 129, 137) sts, starting and finishing on a sc, turn
Row 2: ch1, *sc, ch1, sk1* repeat * to the end, with each sc being worked in the sc from the prev row, turn (65, 73, 81, 93)(101, 109, 117, 129, 137)
Repeat Row until you have (24, 26, 28, 30)(32, 34, 36, 38, 40) rows for this section, and (100, 104, 104, 104)(108, 108, 108, 112, 112) rows in total. Fasten off.
Left Side Section
Row 1: Count across 11 sts (for all sizes) from the middle and join yarn into the 12th st with a sc. *ch1, sk1, sc* repeat * until you have (23, 29, 33, 37)(41, 47, 51, 55, 59) sts, starting and finishing on a sc, turn
Row 2: ch1, *sc, ch1, sk1* repeat * to the end, with each sc being worked in the sc from the prev row, turn (23, 29, 33, 37)(41, 47, 51, 55, 59)
Repeat Row 2 until you have (24, 26, 28, 30)(32, 34, 36, 38, 40) rows for this section, and (100, 104, 104, 104)(108, 108, 108, 112, 112) rows in total. Fasten off.
Seaming
Fold the left and right hand sides over into the middle and sew across the shoulders by lining up the sts and working from the outside in, across the lines highlighted in white below.
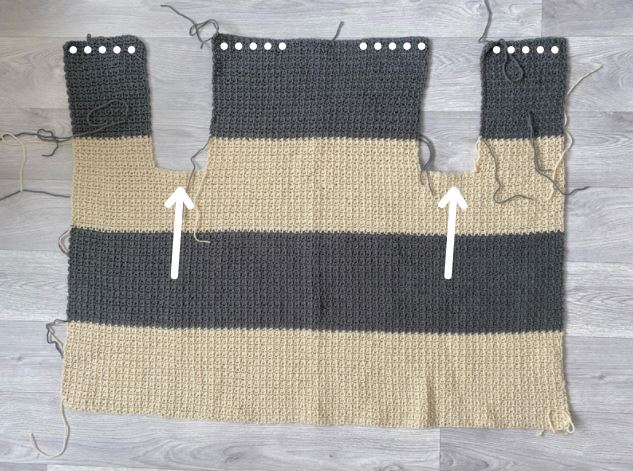
Sleeves (x2)
If you would like to follow the even colour blocks pictured then change colours so that you have 2 blocks of (25, 26, 26, 26)(27, 27, 27, 28, 28) rows, working all remaining rows in the 3rd colour block, in the order A, B, A
Sleeves are built up in the round from the body towards the wrist.
Row 1: With the right side facing, join yarn to the center of the underarm at the point highlighted above. Sc in that st, sc in every st and the side of every row around the sleeve space. Sl st into the first sc, turn (70, 74, 78, 82)(86, 90, 94, 98, 102)
Row 2: ch1, *ch1, sk1, sc* repeat * around, sl st into the 2nd ch1, turn (70, 74, 78, 82)(86, 90, 94, 98, 102)
Row 3: ch1, *sc, ch1, sk1* repeat * around, sl st into the 1st sc, turn (70, 74, 78, 82)(86, 90, 94, 98, 102)
Repeat Rows 2 and 3 until you have (65, 67, 67, 69)(69, 71, 71, 73, 73) rows in total.
If you would like to make the sleeves longer or shorter, make the adjustments at this stage before the decrease rows that follow below.
Dec Row 1: ch1, *ch1, sk1, sc, sk1, sc*, repeat * around, sl st, turn
Row 2: ch1, sc in each sc, skipping the ch1 sts, sl st, turn
Row 3: ch1, *ch1, sk1, sc* repeat, sl st, turn
Rows 4 to 5: ch1, sc in each sc, ch1 and sk1 over each ch1 from the prev row, sl st, turn. Don’t fasten off.
Ribbing
Ribbing will be worked horizontally with sl sts into the last row of the sleeve.
Row 1: ch7, turn, sc in the 2nd ch from the hook and to the end, sl st into the next sc along from the sleeve, turn (6)
Row 2: sc in the back loop only of the next 5 sc, sc in the last sc, turn (6)
Row 3: ch1, sc, sc in the back loop only of each remaining sc, sl st into the next sc along from the sleeve, turn (6)
Repeat Rows 2 and 3 all the way around the sleeve edge until there are no sts to sl st into. Join the first and last rows of ribbing with a whip stitch and fasten off.
Repeat sleeve steps for the other arm.
Edging
Bottom Edging
Join yarn to the front left bottom corner of the body.
Row 1: ch9, sc in the 2nd ch from the hook and to the end back towards the body. Sk 1 st and sl st into the next st of the body, turn (8)
Row 2: sc in the back loop only of the next 7 sc, sc in the last sc, turn (8)
Row 3: ch1, sc, sc in the back loop only of each remaining sc, sk 1 st and sl st into the next st of the body, turn (8)
Repeat Rows 2 and 3 across the full width of the body and fasten off.
Front edging
Join yarn to the front left bottom corner of the body, at the ribbing.
Row 1: ch9, sc in the 2nd ch from the hook and to the end back towards the body. Sk 1 st of the last ribbing row and sl st into the next st, turn (8)
Row 2: sc in the back loop only of the next 7 sc, sc in the last sc, turn (8)
Row 3: ch1, sc, sc in the back loop only of each remaining sc, sk 1 st and sl st into the next st of the body, turn (8)
Repeat Rows 2 and 3 up the full length of the body, around the neckline and down the other side, and fasten off. The sl sts in Row 3 repeat will be worked in every other st when working into the ribbing or the neckline, or the end of every other row when working up and down the body.
Not ready to start? Pin this post for later: Long Striped Crochet Cardigan Pattern or add to your pattern queue from the stores below.
