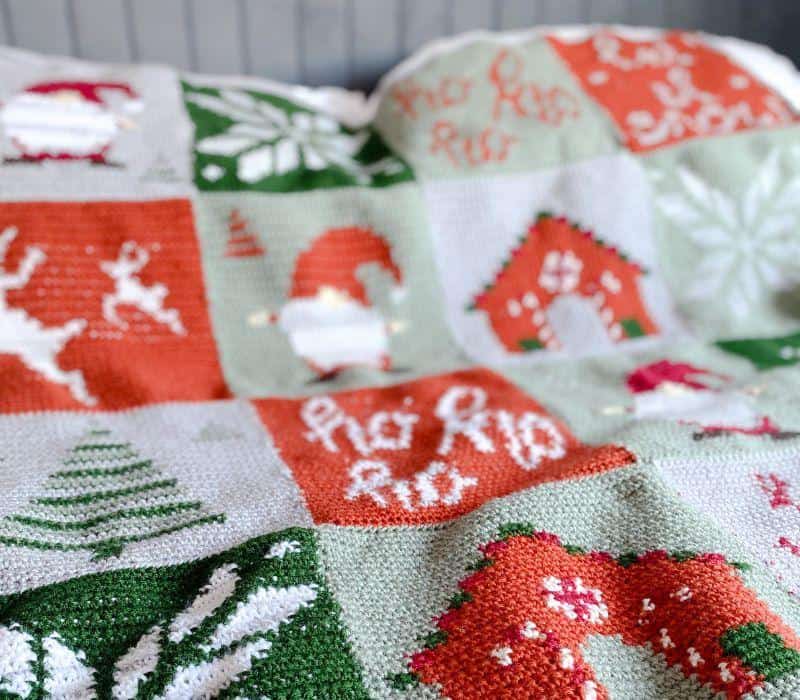
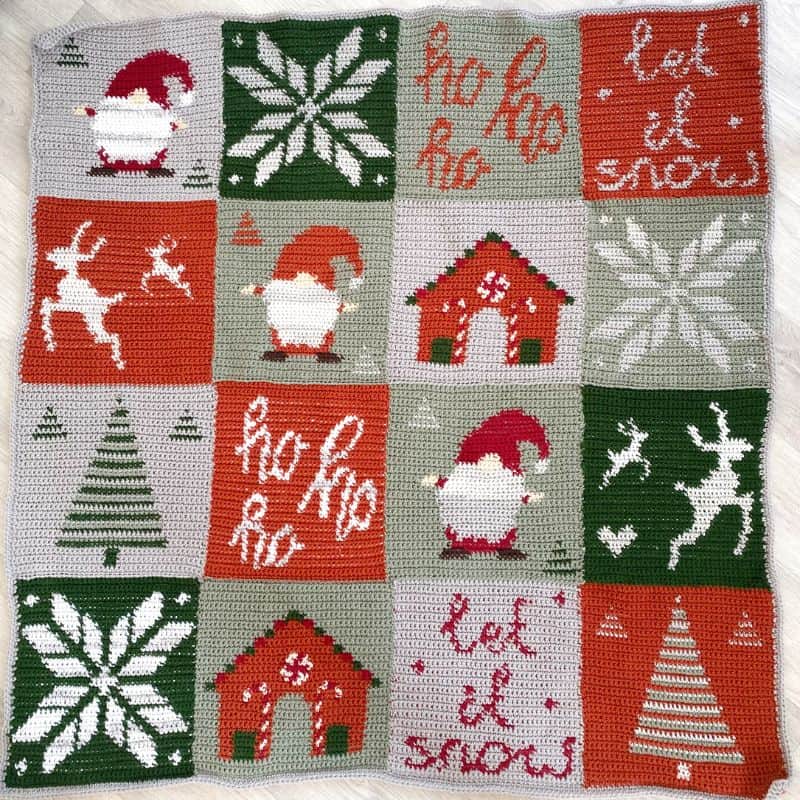
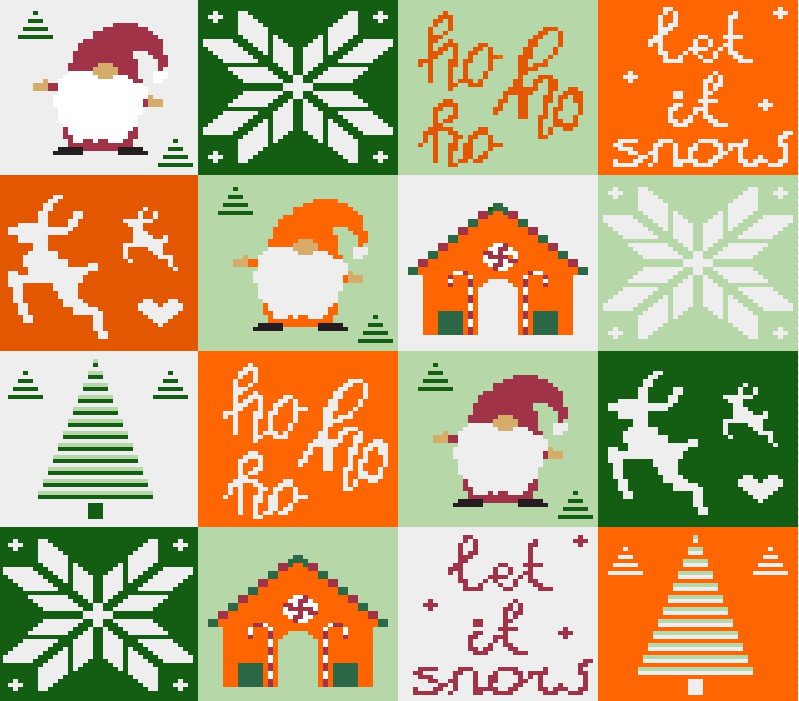
It’s that time of the year again, and I’ve got something extra special to make your holiday season even cozier – a tapestry crochet Christmas blanket pattern! Made up from squares of all of our festive favourites, you’ll have a blanket that will become a part of your holiday traditions for years to come. It’s a Crochet Along, so the design for each part of the blanket will come out week by week so you can build up your blanket along with other makers!
In this CAL, we’ll be exploring colour changes to bring you a beautiful tapestry crochet Christmas blanket. This pattern is the perfect blend of traditional crochet and modern design, to cozy up your front room holiday decor.
Whether you’re a colour work pro or just starting out, this pattern is perfect for spreading some festive cheer!
How does the Crochet Along work?
Every week the pattern for that week’s square will be released here, on this post. You’ll find the written pattern for the square, a chart, photos and yarn requirements. I’ll send an email reminder and post on IG when the pattern is released each week. Each square features in the finished blanket twice or more.
CAL Release Schedule
Square 1 – 1st October
Square 2 – 8th October
Square 3 – 15th October
Square 4 – 22nd October
Square 5 – 28th October
Square 6 – 5th November
Square 7 – 12th November
Joining and border – 19th November
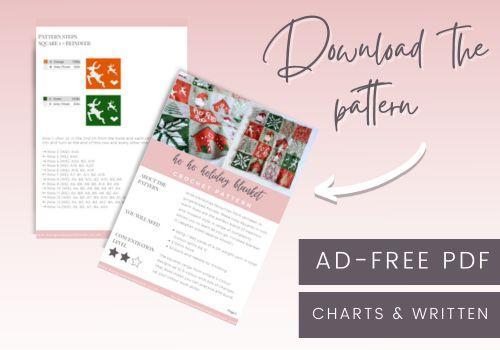
Don’t want to wait? You can get the full PDF with all the square’s patterns, ad-free and all in one document, here.


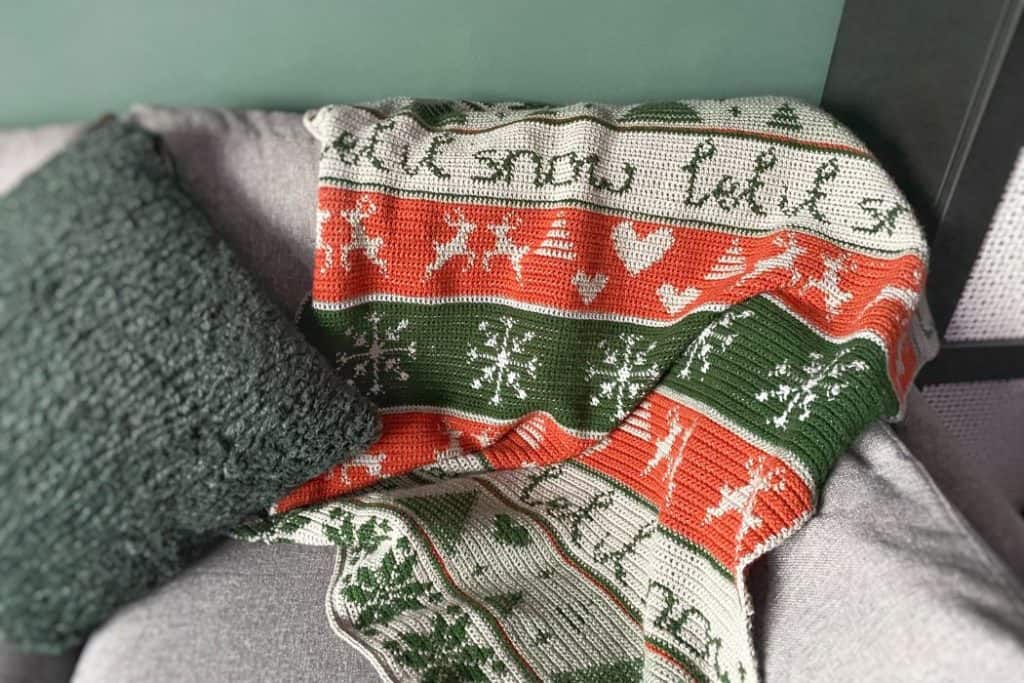
Squares not your favourite? Check out the Let it Snow Blanket! It’s a very similar style and palette but written in rows.
This post contains affiliate links, meaning I may make a commission if you purchase through a link, at no additional cost to you.
What you’ll need
- 660g / 1993 yards of a DK weight yarn in total (colour splits below)
- 5.0mm hook
- Scissors and needle for finishing
Full yardage
To follow the same colour layout I have used (with any colours of your choice), the total requirements for the full blanket are below.
Grey (flat): 118g I used <2 skeins Paintbox Yarns Simply DK in Elephant grey
Grey (tones): 110g I used <2 skeins King Cole Baby Stripe DK in Baby Silver
Red: 29g I used <1 skein Stylecraft Special DK in Claret
Dark green: 94g I used <1 skein Paintbox Yarns Simply DK in Racing green
Orange: 158g I used <2 skeins Stylecraft Special DK in Copper
Sage green: 140g I used <2 skeins Paintbox Yarns Simply DK in Pine green
Cream: scraps / 4g (used for one square only)
Beige: scraps / 3g (used for one square only)
Brown: scraps / 3g (used for one square only)

Pattern notes
- The pattern is split into each of the 7 square designs. Each section will include the written pattern (explained below), a colour key and a chart.
- Pattern definitions:
- → Row 2 [WS]: A160
- Means row 2 is worked on the wrong side, with 160 sc stitches in colour A
- ← Row 3 [RS]: A2, B1, A2
- Means row 3 is worked on the right side with 2 sc in colour A, 1 sc in colour B, 2 sc in colour A and so on
- Each section includes examples of the colour variations i’ve used so you can follow the same yardage requirements if chosen.
- Keep a close eye on tension when changing colours and expect to need to block a couple of squares to make them all the size size and square shape.
Concentration level
The squares range from simple 2-colour designs up to 5-colour with lots of changes. That does mean you can practice and build up your colour work skills! Some of the squares work well with carrying the yarn under your stitches (which is great for having very few ends to weave), some will be best by changing colours on individual rows only (very simple but more ends involved), and those with more colours in the design would be ideal for using bobbins. But, with all of them you can of course use whichever colour changing methods you prefer or are most comfortable with.
Gauge
Using sc stitches: 18 rows of 16 sc in 4″
A different gauge won’t affect the pattern but will likely end up in a smaller or larger blanket and may affect the yarn requirements.
Sizing
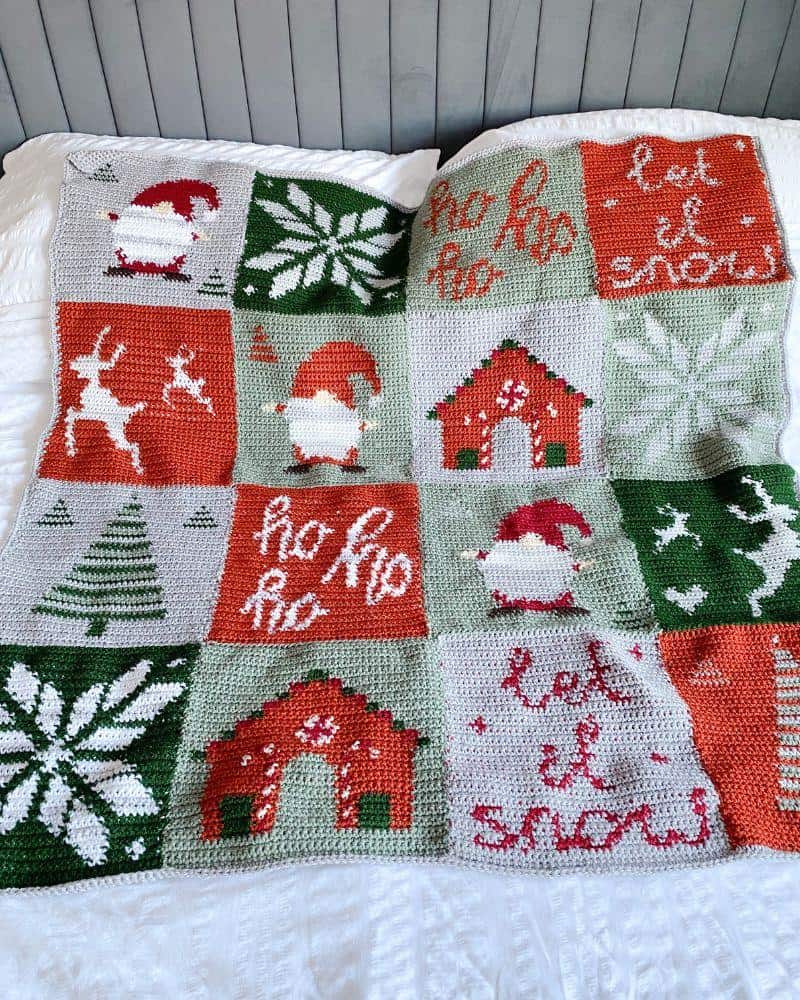
Each square should measure approx 25x25cm / 10×10″, and the total size will be 100x100cm / 40×40″. Should you use, you can always make more squares to have a bigger afghan size blanket.

Tapestry Crochet Christmas Blanket
Square 1
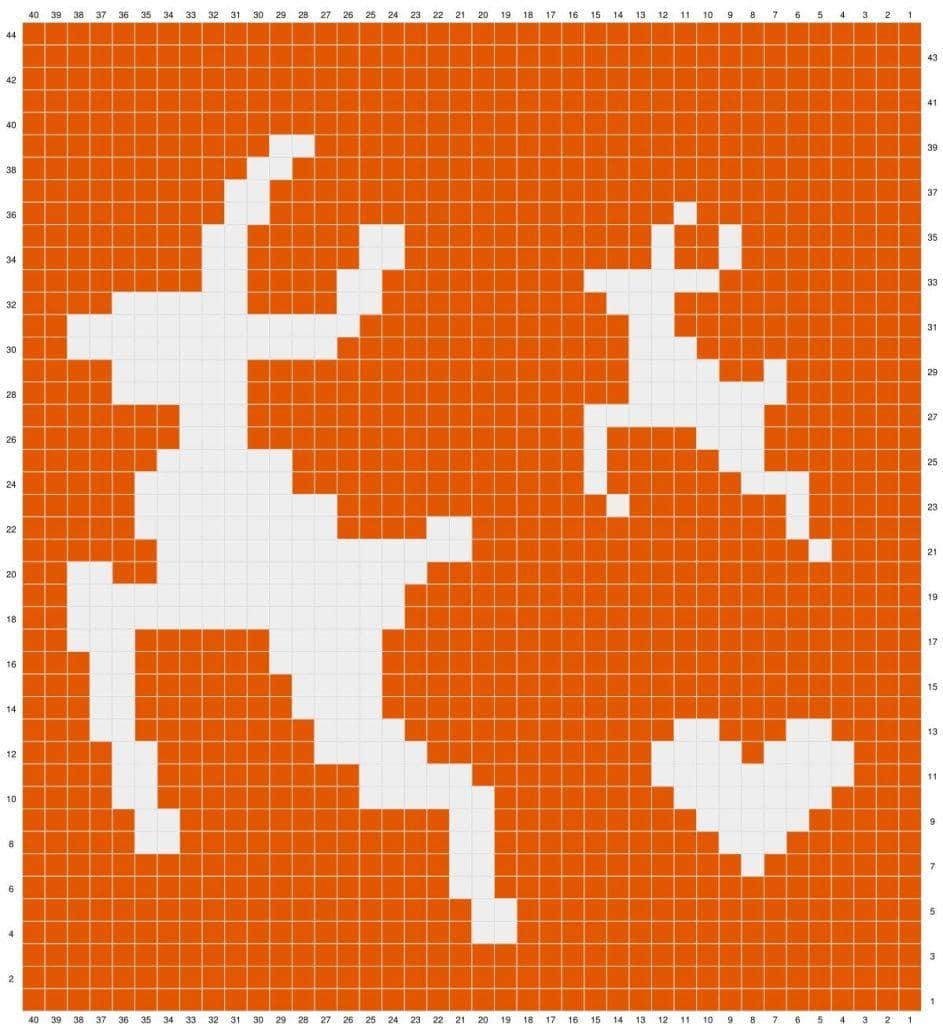
Reindeer Crochet Pattern
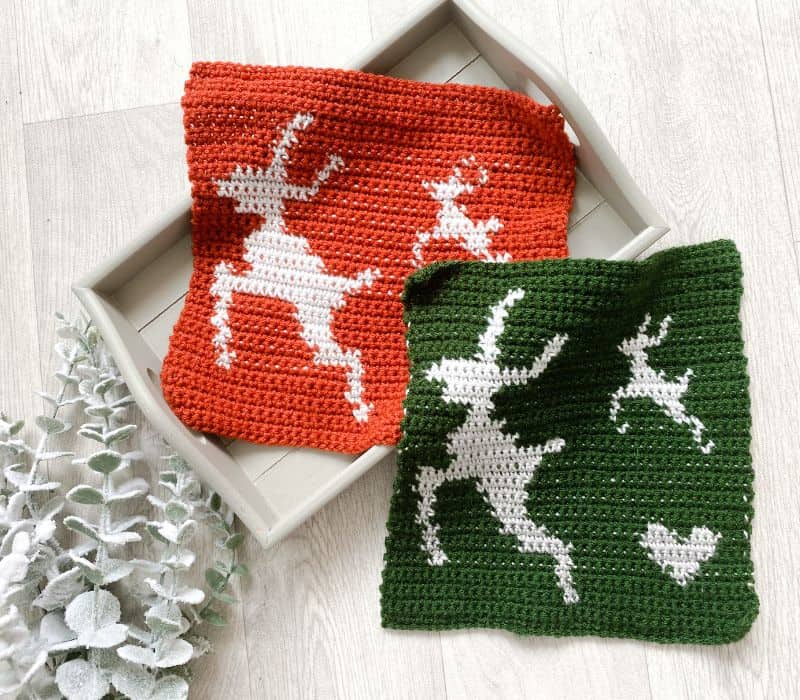
For this blanket you’ll want 2 colours and the secondary colour will be carried under the stitches throughout the square. You can see the white under the green stitches in the photo above, so be mindful of that with your colour choices, but I quite like it! I think it looks a little sparkly? To follow the written pattern layout, make 2 of these squares.
Row 1: ch41, sc in the 2nd ch from the hook and each ch to the end, Ch1 and turn at the end of this row and every other row below.
→ Row 2 [WS]: A40
← Row 3 [RS]: A40
→ Row 4 [WS]: A20, B2, A18
← Row 5 [RS]: A18, B2, A20
→ Row 6 [WS]: A19, B2, A19
← Row 7 [RS]: A7, B1, A11, B2, A19
→ Row 8 [WS]: A5, B2, A12, B2, A10, B3, A6
← Row 9 [RS]: A5, B5, A9, B2, A12, B2, A5
→ Row 10 [WS]: A4, B2, A9, B6, A8, B7, A4
← Row 11 [RS]: A3, B9, A8, B5, A9, B2, A4
→ Row 12 [WS]: A4, B2, A7, B5, A10, B4, A1, B4, A3
← Row 13 [RS]: A4, B2, A3, B2, A12, B4, A8, B2, A3
→ Row 14 [WS]: A3, B2, A7, B4, A24
← Row 15 [RS]: A24, B4, A7, B2, A3
→ Row 16 [WS]: A3, B2, A6, B5, A24
← Row 17 [RS]: A24, B5, A6, B3, A2
→ Row 18 [WS]: A2, B15, A23
← Row 19 [RS]: A23, B15, A2
→ Row 20 [WS]: A2, B2, A2, B12, A22
← Row 21 [RS]: A4, B1, A15, B14, A6
→ Row 22 [WS]: A5, B9, A4, B2, A14, B1, A5
← Row 23 [RS]: A5, B1, A7, B1, A12, B9, A5
→ Row 24 [WS]: A5, B7, A13, B1, A6, B3, A5
← Row 25 [RS]: A7, B2, A5, B1, A13, B6, A6
→ Row 26 [WS]: A7, B3, A15, B1, A4, B3, A7
← Row 27 [RS]: A7, B8, A15, B3, A7
→ Row 28 [WS]: A4, B6, A17, B7, A6
← Row 29 [RS]: A6, B1, A2, B4, A17, B6, A4
→ Row 30 [WS]: A2, B12, A13, B3, A10
← Row 31 [RS]: A11, B2, A12, B13, A2
→ Row 32 [WS]: A4, B6, A4, B2, A10, B3, A11
← Row 33 [RS]: A9, B6, A9, B2, A4, B2, A8
→ Row 34 [WS]: A8, B2, A5, B2, A11, B1, A2, B1, A8
← Row 35 [RS]: A8, B1, A2, B1, A11, B2, A5, B2, A8
→ Row 36 [WS]: A9, B2, A18, B1, A10
← Row 37 [RS]: A29, B2, A9
→ Row 38 [WS]: A10, B2, A28
← Row 39 [RS]: A27, B2, A11
→ Row 40 [WS]: A40
← Row 41 [RS]: A40
→ Row 42 [WS]: A40
← Row 43 [RS]: A40
→ Row 44 [WS]: A40
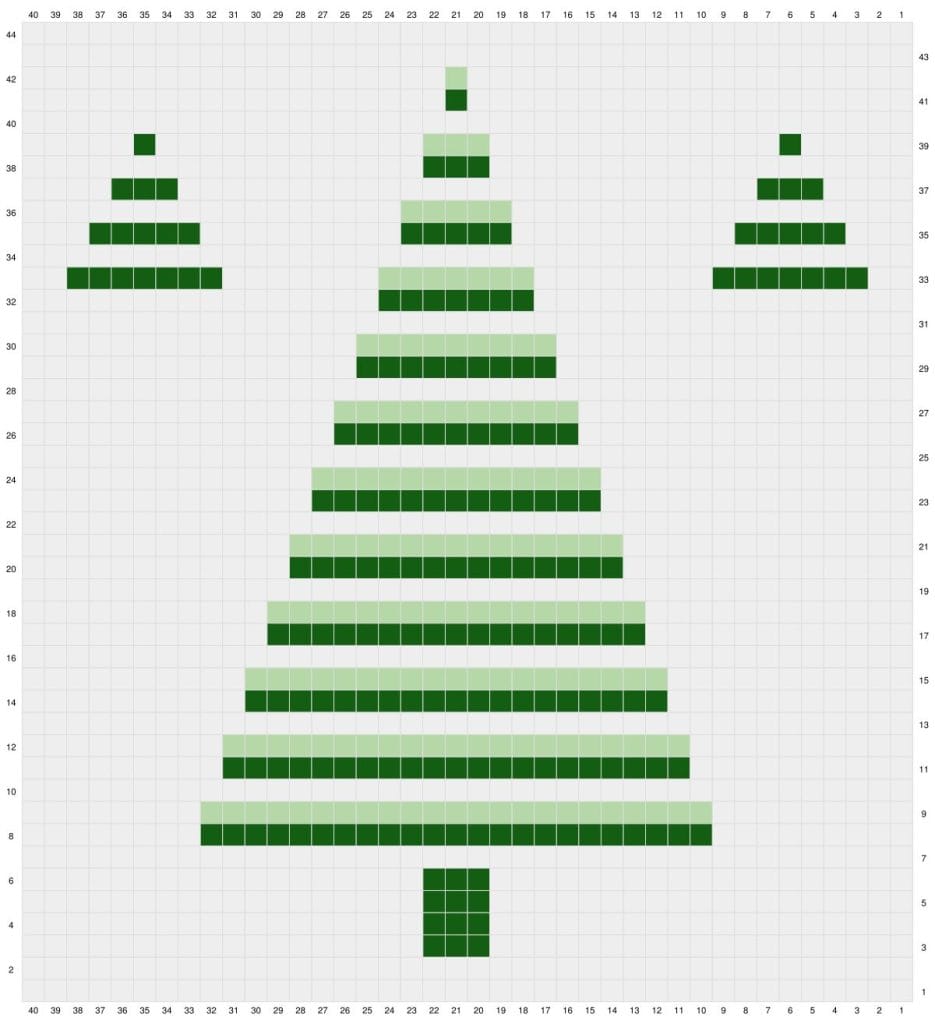
Square 2
Christmas Tree Crochet Pattern
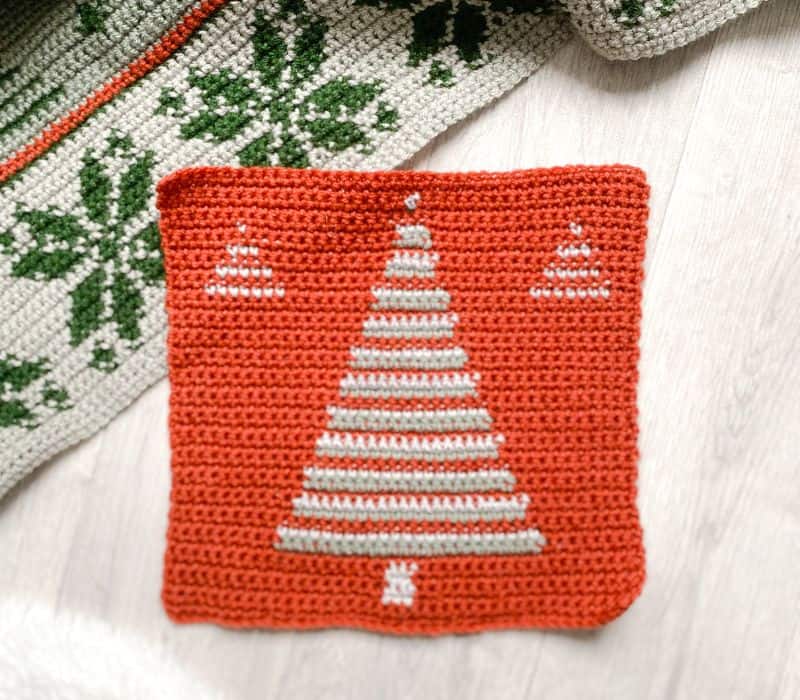
You’ll want at least 3 colours for this square, one for the base and 2 more for the tree rows. For this one I suggest cutting the colour change yarn at the end of each row of the tree rather than carrying it under or up. To follow the written pattern layout, make 2 of these squares.
Row 1: ch41, sc in the 2nd ch from the hook and each ch to the end, Ch1 and turn at the end of this row and every other row below.
→ Row 2 [WS]: A40
← Row 3 [RS]: A19, B3, A18
→ Row 4 [WS]: A18, B3, A19
← Row 5 [RS]: A19, B3, A18
→ Row 6 [WS]: A18, B3, A19
← Row 7 [RS]: A40
→ Row 8 [WS]: A8, B23, A9
← Row 9 [RS]: A9, C23, A8
→ Row 10 [WS]: A40
← Row 11 [RS]: A10, B21, A9
→ Row 12 [WS]: A9, C21, A10
← Row 13 [RS]: A40
→ Row 14 [WS]: A10, B19, A11
← Row 15 [RS]: A11, C19, A10
→ Row 16 [WS]: A40
← Row 17 [RS]: A12, B17, A11
→ Row 18 [WS]: A11, C17, A12
← Row 19 [RS]: A40
→ Row 20 [WS]: A12, B15, A13
← Row 21 [RS]: A13, C15, A12
→ Row 22 [WS]: A40
← Row 23 [RS]: A14, B13, A13
→ Row 24 [WS]: A13, C13, A14
← Row 25 [RS]: A40
→ Row 26 [WS]: A14, B11, A15
← Row 27 [RS]: A15, C11, A14
→ Row 28 [WS]: A40
← Row 29 [RS]: A16, B9, A15
→ Row 30 [WS]: A15, C9, A16
← Row 31 [RS]: A40
→ Row 32 [WS]: A16, B7, A17
← Row 33 [RS]: A2, B7, A8, C7, A7, B7, A2
→ Row 34 [WS]: A40
← Row 35 [RS]: A3, B5, A10, B5, A9, B5, A3
→ Row 36 [WS]: A17, C5, A18
← Row 37 [RS]: A4, B3, A26, B3, A4
→ Row 38 [WS]: A18, B3, A19
← Row 39 [RS]: A5, B1, A13, C3, A12, B1, A5
→ Row 40 [WS]: A40
← Row 41 [RS]: A20, B1, A19
→ Row 42 [WS]: A19, C1, A20
← Row 43 [RS]: A40
→ Row 44 [WS]: A40
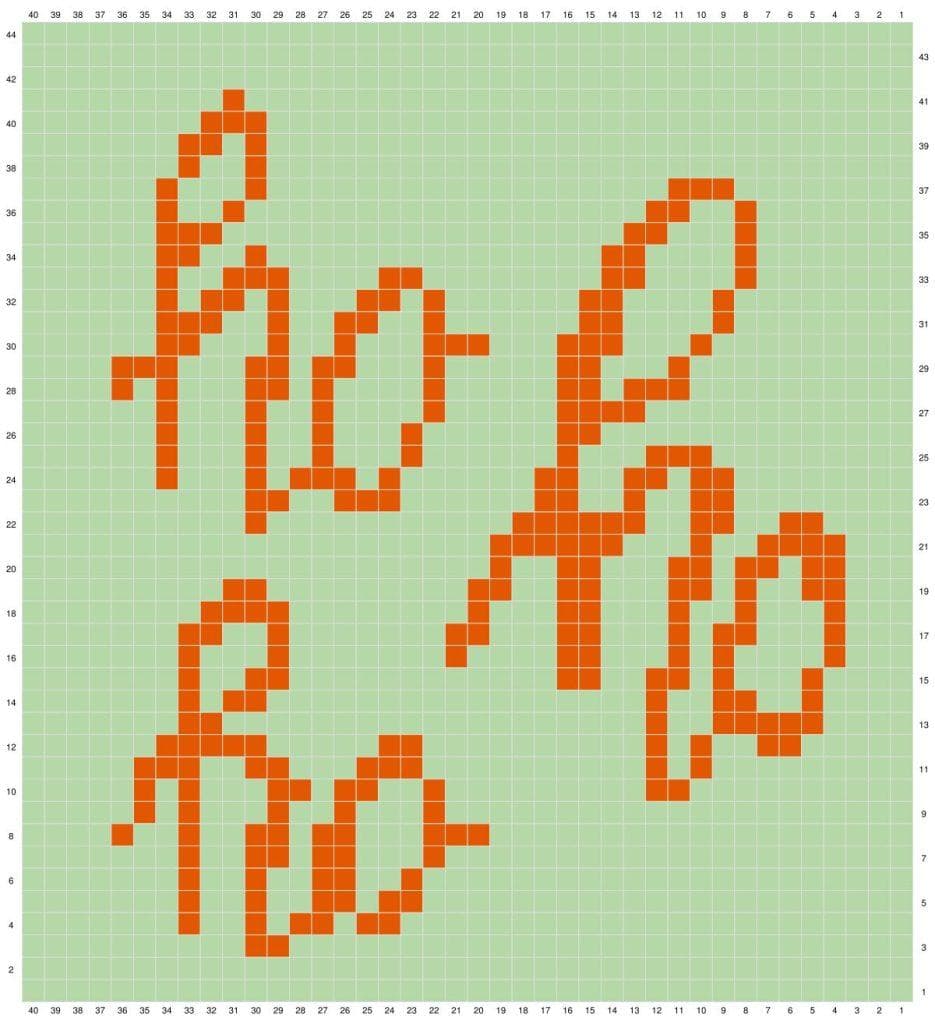
Square 3
Christmas Lettering Crochet Pattern > Ho Ho Ho

Tips for this square, carry the secondary colour under the main colour. You’ll need two colours, and make two squares to follow the written pattern.
Row 1: ch41, sc in the 2nd ch from the hook and each ch to the end, Ch1 and turn at the end of this row and every other row below.
→ Row 2 [WS]: A40
← Row 3 [RS]: A28, B2, A10
→ Row 4 [WS]: A7, B1, A2, B1, A1, B2, A1, B2, A23
← Row 5 [RS]: A22, B2, A1, B2, A2, B1, A2, B1, A7
→ Row 6 [WS]: A7, B1, A2, B1, A2, B2, A2, B1, A22
← Row 7 [RS]: A21, B1, A3, B2, A1, B2, A2, B1, A7
→ Row 8 [WS]: A4, B1, A2, B1, A2, B2, A1, B2, A3, B3, A19
← Row 9 [RS]: A21, B1, A3, B1, A2, B1, A3, B1, A1, B1, A5
→ Row 10 [WS]: A5, B1, A1, B1, A3, B2, A1, B2, A2, B1, A9, B2, A10
← Row 11 [RS]: A9, B1, A1, B1, A10, B3, A3, B2, A2, B3, A5
→ Row 12 [WS]: A6, B5, A5, B2, A10, B1, A1, B1, A2, B2, A5
← Row 13 [RS]: A4, B5, A2, B1, A19, B2, A7
→ Row 14 [WS]: A7, B1, A1, B2, A17, B1, A2, B2, A2, B1, A4
← Row 15 [RS]: A4, B1, A3, B1, A1, B2, A2, B2, A12, B2, A2, B1, A7
→ Row 16 [WS]: A7, B1, A3, B1, A7, B1, A4, B2, A3, B1, A1, B1, A4, B1, A3
← Row 17 [RS]: A3, B1, A3, B2, A1, B1, A3, B2, A3, B2, A7, B1, A2, B2, A7
→ Row 18 [WS]: A8, B4, A8, B1, A3, B2, A3, B1, A2, B1, A3, B1, A3
← Row 19 [RS]: A3, B2, A2, B1, A1, B2, A3, B2, A2, B2, A9, B2, A9
→ Row 20 [WS]: A21, B1, A2, B2, A3, B2, A1, B2, A1, B2, A3
← Row 21 [RS]: A3, B4, A2, B1, A3, B6, A21
→ Row 22 [WS]: A10, B1, A11, B6, A2, B2, A2, B2, A4
← Row 23 [RS]: A8, B2, A2, B1, A2, B2, A6, B3, A2, B2, A10
→ Row 24 [WS]: A6, B1, A3, B1, A1, B3, A1, B1, A6, B2, A2, B2, A1, B2, A8
← Row 25 [RS]: A9, B3, A3, B1, A6, B1, A3, B1, A2, B1, A3, B1, A6
→ Row 26 [WS]: A6, B1, A3, B1, A2, B1, A3, B1, A6, B2, A14
← Row 27 [RS]: A12, B4, A5, B1, A4, B1, A2, B1, A3, B1, A6
→ Row 28 [WS]: A4, B1, A1, B1, A3, B2, A1, B1, A4, B1, A5, B2, A1, B3, A10
← Row 29 [RS]: A10, B1, A3, B2, A5, B1, A3, B2, A1, B2, A3, B3, A4
→ Row 30 [WS]: A6, B2, A3, B1, A2, B1, A3, B3, A3, B3, A3, B1, A9
← Row 31 [RS]: A8, B1, A4, B2, A6, B1, A2, B2, A2, B1, A2, B3, A6
→ Row 32 [WS]: A6, B1, A1, B2, A1, B1, A3, B2, A1, B1, A6, B2, A4, B1, A8
← Row 33 [RS]: A7, B1, A4, B2, A8, B2, A4, B3, A2, B1, A6
→ Row 34 [WS]: A6, B2, A2, B1, A15, B2, A4, B1, A7
← Row 35 [RS]: A7, B1, A3, B2, A18, B3, A6
→ Row 36 [WS]: A6, B1, A2, B1, A18, B2, A2, B1, A7
← Row 37 [RS]: A8, B3, A18, B1, A3, B1, A6
→ Row 38 [WS]: A7, B1, A2, B1, A29
← Row 39 [RS]: A29, B1, A1, B2, A7
→ Row 40 [WS]: A8, B3, A29
← Row 41 [RS]: A30, B1, A9
→ Row 42 [WS]: A40
← Row 43 [RS]: A40
→ Row 44 [WS]: A40
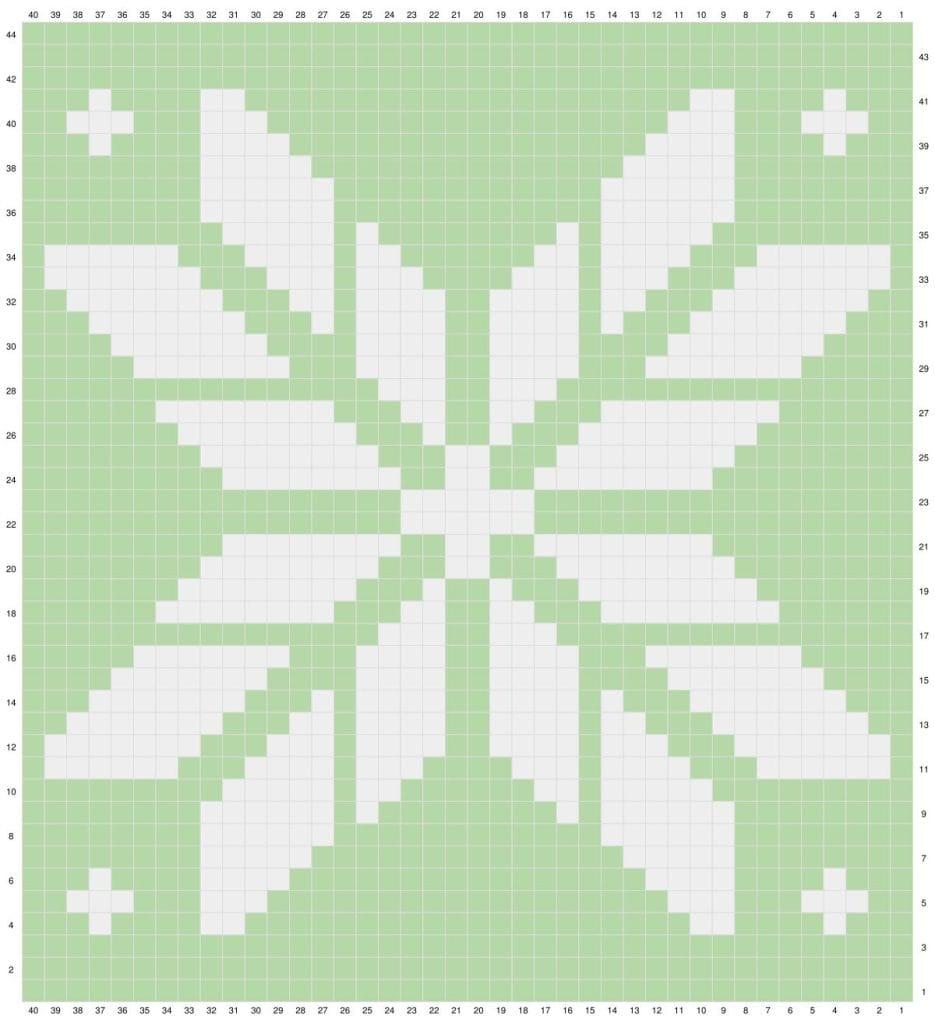
Square 4
Fairisle Snowflake Pattern
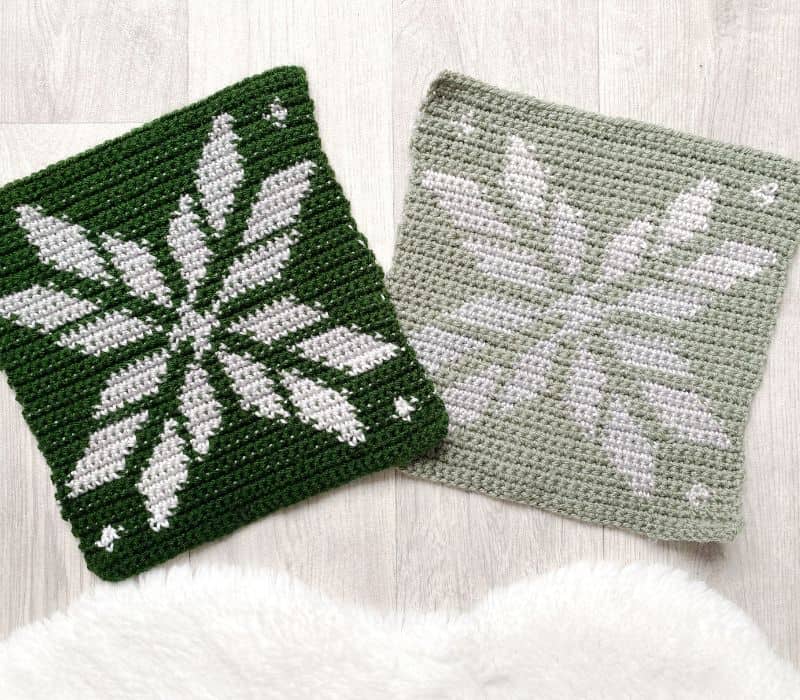
Tips for this square: carry the white yarn under the green. Be mindful of tension on this square in particular. Make 3 to follow written layout and yardage.
Row 1: ch41, sc in the 2nd ch from the hook and each ch to the end, Ch1 and turn at the end of this row and every other row below.
→ Row 2 [WS]: A40
← Row 3 [RS]: A40
→ Row 4 [WS]: A3, B1, A4, B2, A20, B2, A4, B1, A3
← Row 5 [RS]: A2, B3, A3, B3, A18, B3, A3, B3, A2
→ Row 6 [WS]: A3, B1, A4, B4, A16, B4, A4, B1, A3
← Row 7 [RS]: A8, B5, A14, B5, A8
→ Row 8 [WS]: A8, B6, A12, B6, A8
← Row 9 [RS]: A8, B6, A1, B1, A8, B1, A1, B6, A8
→ Row 10 [WS]: A9, B5, A1, B2, A6, B2, A1, B5, A9
← Row 11 [RS]: A1, B6, A3, B4, A1, B3, A4, B3, A1, B4, A3, B6, A1
→ Row 12 [WS]: A1, B7, A3, B3, A1, B4, A2, B4, A1, B3, A3, B7, A1
← Row 13 [RS]: A2, B7, A3, B2, A1, B4, A2, B4, A1, B2, A3, B7, A2
→ Row 14 [WS]: A3, B7, A3, B1, A1, B4, A2, B4, A1, B1, A3, B7, A3
← Row 15 [RS]: A4, B7, A4, B4, A2, B4, A4, B7, A4
→ Row 16 [WS]: A5, B7, A3, B4, A2, B4, A3, B7, A5
← Row 17 [RS]: A16, B3, A2, B3, A16
→ Row 18 [WS]: A6, B8, A3, B2, A2, B2, A3, B8, A6
← Row 19 [RS]: A7, B8, A3, B1, A2, B1, A3, B8, A7
→ Row 20 [WS]: A8, B8, A3, B2, A3, B8, A8
← Row 21 [RS]: A9, B8, A2, B2, A2, B8, A9
→ Row 22 [WS]: A17, B6, A17
← Row 23 [RS]: A17, B6, A17
→ Row 24 [WS]: A9, B8, A2, B2, A2, B8, A9
← Row 25 [RS]: A8, B8, A3, B2, A3, B8, A8
→ Row 26 [WS]: A7, B8, A3, B1, A2, B1, A3, B8, A7
← Row 27 [RS]: A6, B8, A3, B2, A2, B2, A3, B8, A6
→ Row 28 [WS]: A16, B3, A2, B3, A16
← Row 29 [RS]: A5, B7, A3, B4, A2, B4, A3, B7, A5
→ Row 30 [WS]: A4, B7, A4, B4, A2, B4, A4, B7, A4
← Row 31 [RS]: A3, B7, A3, B1, A1, B4, A2, B4, A1, B1, A3, B7, A3
→ Row 32 [WS]: A2, B7, A3, B2, A1, B4, A2, B4, A1, B2, A3, B7, A2
← Row 33 [RS]: A1, B7, A3, B3, A1, B3, A4, B3, A1, B3, A3, B7, A1
→ Row 34 [WS]: A1, B6, A3, B4, A1, B2, A6, B2, A1, B4, A3, B6, A1
← Row 35 [RS]: A9, B5, A1, B1, A8, B1, A1, B5, A9
→ Row 36 [WS]: A8, B6, A12, B6, A8
← Row 37 [RS]: A8, B6, A12, B6, A8
→ Row 38 [WS]: A8, B5, A14, B5, A8
← Row 39 [RS]: A3, B1, A4, B4, A16, B4, A4, B1, A3
→ Row 40 [WS]: A2, B3, A3, B3, A18, B3, A3, B3, A2
← Row 41 [RS]: A3, B1, A4, B2, A20, B2, A4, B1, A3
→ Row 42 [WS]: A40
← Row 43 [RS]: A40
→ Row 44 [WS]: A40
Square 5
Christmas Gonk Crochet Pattern
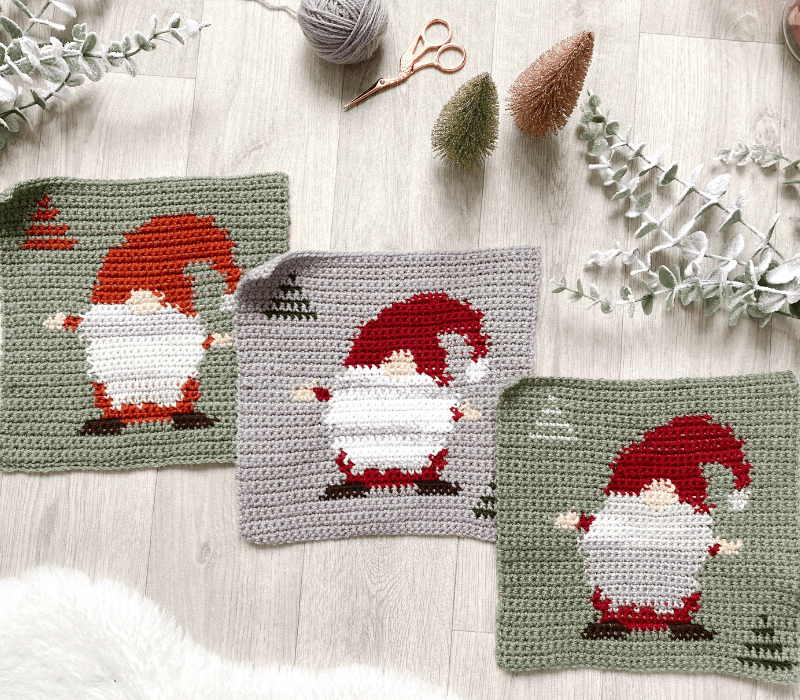
Tips for this square: use bobbins or a combination of bobbins / carrying yarn. From row 7 onwards where there are multiple colours per 1 row, I recommend splitting the background shade into two bobbins. I prefer not to carry yarn under the light grey used in the beard so suggest bobbins for the ‘legs’, arms, hands and nose. Your choice. Make 3 to follow written layout and yardage.
Row 1: ch41, sc in the 2nd ch from the hook and each ch to the end, Ch1 and turn at the end of this row and every other row below.
→ Row 2 [WS]: A40
← Row 3 [RS]: A1, B7, A32
→ Row 4 [WS]: A40
← Row 5 [RS]: A2, B5, A33
→ Row 6 [WS]: A11, E6, A7, E6, A10
← Row 7 [RS]: A3, B3, A5, E5, D7, E5, A12
→ Row 8 [WS]: A14, D13, A13
← Row 9 [RS]: A4, B1, A8, D2, C3, D2, C1, D1, C3, D1, A14
→ Row 10 [WS]: A13, D2, C11, D2, A12
← Row 11 [RS]: A12, D2, C12, D1, A13
→ Row 12 [WS]: A13, D1, C13, D1, A12
← Row 13 [RS]: A12, C15, A13
→ Row 14 [WS]: A12, C16, A12
← Row 15 [RS]: A12, C16, A12
→ Row 16 [WS]: A12, C17, A11
← Row 17 [RS]: A11, C17, A12
→ Row 18 [WS]: A11, C18, D1, F3, A7
← Row 19 [RS]: A7, F3, D1, C18, A11
→ Row 20 [WS]: A11, C19, F1, A9
← Row 21 [RS]: A10, C18, A12
→ Row 22 [WS]: A7, F3, D2, C18, A10
← Row 23 [RS]: A11, C17, D2, F3, A7
→ Row 24 [WS]: A9, F1, A2, C15, D2, A2, C2, A7
← Row 25 [RS]: A6, C3, A3, D2, C3, F3, C7, A13
→ Row 26 [WS]: A14, C5, F5, D4, A3, C3, A6
← Row 27 [RS]: A7, D1, A4, D4, F5, D5, A14
→ Row 28 [WS]: A14, D6, F3, D5, A4, D2, A6
← Row 29 [RS]: A6, D2, A4, D13, A15
→ Row 30 [WS]: A15, D12, A4, D3, A6
← Row 31 [RS]: A7, D3, A3, D12, A15
→ Row 32 [WS]: A16, D17, A7
← Row 33 [RS]: A7, D17, A16
→ Row 34 [WS]: A17, D16, A7
← Row 35 [RS]: A8, D13, A8, B7, A4
→ Row 36 [WS]: A19, D12, A9
← Row 37 [RS]: A10, D9, A11, B5, A5
→ Row 38 [WS]: A23, D5, A12
← Row 39 [RS]: A31, B3, A6
→ Row 40 [WS]: A40
← Row 41 [RS]: A32, B1, A7
→ Row 42 [WS]: A40
← Row 43 [RS]: A40
→ Row 44 [WS]: A40

Square 6
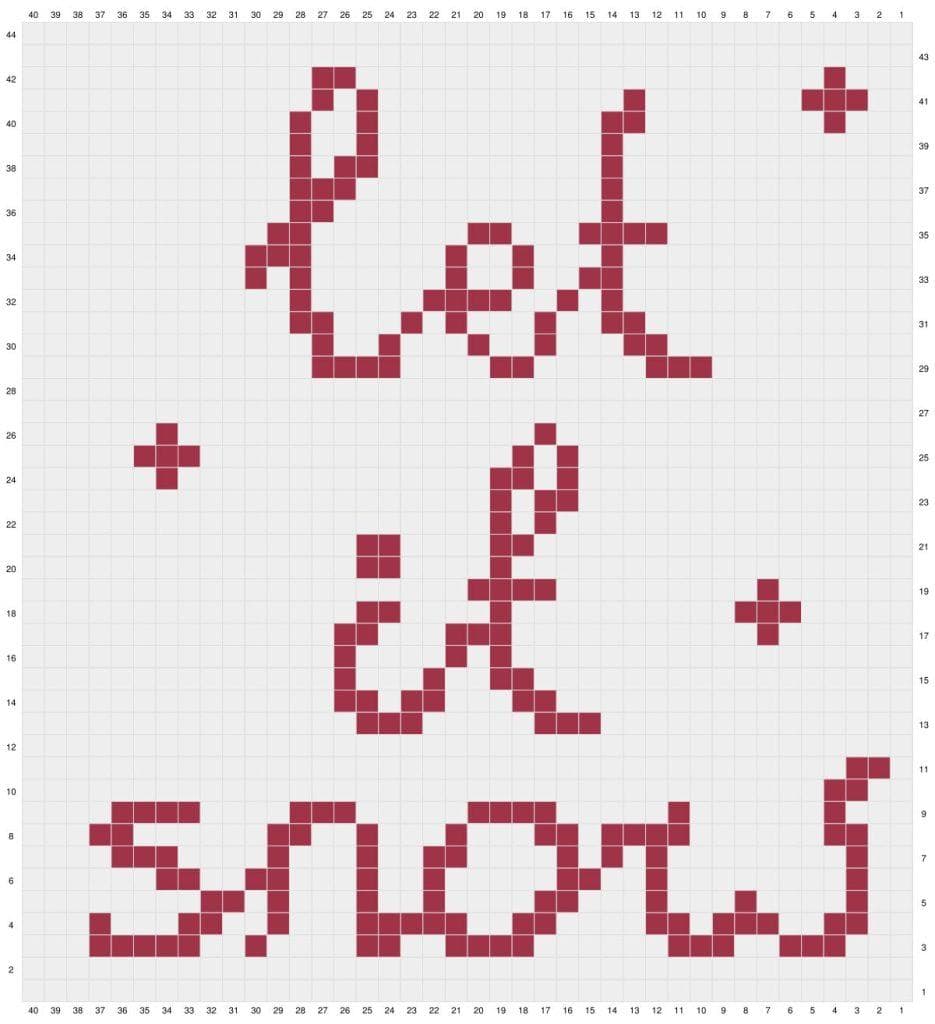
Christmas Lettering Crochet Pattern
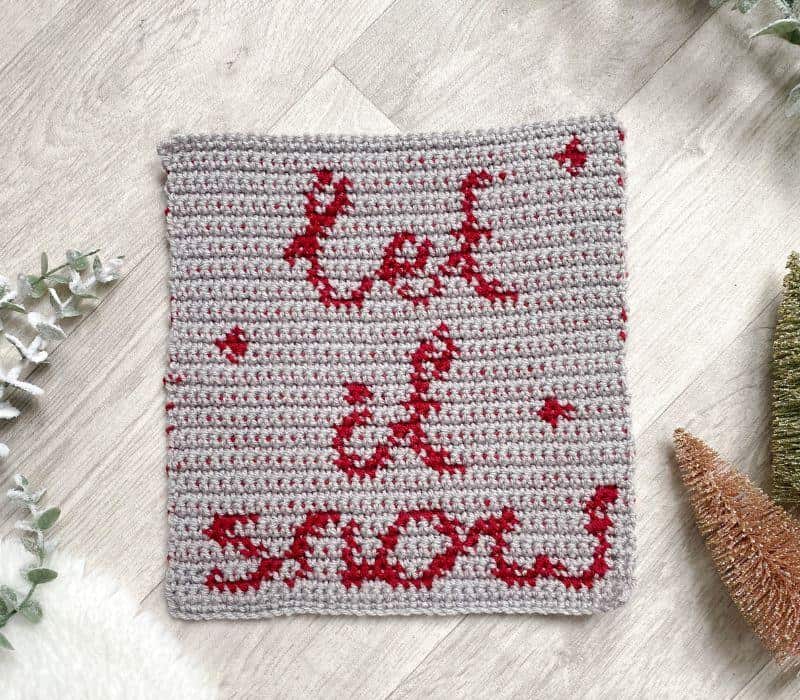
Tips for this square: carry the lettering yarn under the base colour yarn. Make 2 to follow written layout and yardage.
Row 1: ch41, sc in the 2nd ch from the hook and each ch to the end, Ch1 and turn at the end of this row and every other row below.
→ Row 2 [WS]: A40
← Row 3 [RS]: A3, B3, A2, B3, A6, B4, A2, B2, A4, B1, A2, B5, A3
→ Row 4 [WS]: A3, B1, A3, B2, A2, B1, A3, B5, A2, B2, A4, B2, A1, B3, A2, B2, A2
← Row 5 [RS]: A2, B1, A4, B1, A3, B1, A3, B2, A4, B1, A2, B1, A3, B1, A1, B2, A8
→ Row 6 [WS]: A6, B2, A2, B2, A3, B1, A2, B2, A4, B2, A2, B1, A8, B1, A2
← Row 7 [RS]: A2, B1, A8, B1, A1, B1, A1, B1, A4, B2, A2, B1, A3, B1, A4, B3, A4
→ Row 8 [WS]: A3, B2, A6, B2, A2, B1, A3, B1, A3, B2, A1, B4, A6, B2, A2
← Row 9 [RS]: A3, B1, A6, B1, A5, B4, A5, B3, A4, B4, A4
→ Row 10 [WS]: A36, B2, A2
← Row 11 [RS]: A1, B2, A37
→ Row 12 [WS]: A40
← Row 13 [RS]: A14, B3, A5, B3, A15
→ Row 14 [WS]: A14, B2, A1, B2, A3, B2, A16
← Row 15 [RS]: A17, B2, A2, B1, A3, B1, A14
→ Row 16 [WS]: A14, B1, A4, B1, A1, B1, A18
← Row 17 [RS]: A6, B1, A11, B3, A3, B2, A14
→ Row 18 [WS]: A15, B2, A4, B1, A10, B3, A5
← Row 19 [RS]: A6, B1, A9, B4, A20
→ Row 20 [WS]: A15, B2, A4, B1, A18
← Row 21 [RS]: A17, B2, A4, B2, A15
→ Row 22 [WS]: A21, B1, A1, B1, A16
← Row 23 [RS]: A15, B2, A1, B1, A21
→ Row 24 [WS]: A6, B1, A14, B2, A1, B1, A15
← Row 25 [RS]: A15, B1, A1, B1, A14, B3, A5
→ Row 26 [WS]: A6, B1, A16, B1, A16
← Row 27 [RS]: A40
→ Row 28 [WS]: A40
← Row 29 [RS]: A9, B3, A5, B2, A4, B4, A13
→ Row 30 [WS]: A13, B1, A2, B1, A3, B1, A2, B1, A3, B2, A11
← Row 31 [RS]: A12, B2, A2, B1, A3, B1, A1, B1, A3, B2, A12
→ Row 32 [WS]: A12, B1, A5, B4, A2, B1, A1, B1, A13
← Row 33 [RS]: A13, B2, A2, B1, A2, B1, A6, B1, A1, B1, A10
→ Row 34 [WS]: A10, B3, A6, B1, A2, B1, A3, B1, A13
← Row 35 [RS]: A11, B4, A3, B2, A7, B2, A11
→ Row 36 [WS]: A12, B2, A12, B1, A13
← Row 37 [RS]: A13, B1, A11, B3, A12
→ Row 38 [WS]: A12, B1, A1, B2, A10, B1, A13
← Row 39 [RS]: A13, B1, A10, B1, A2, B1, A12
→ Row 40 [WS]: A12, B1, A2, B1, A10, B2, A8, B1, A3
← Row 41 [RS]: A2, B3, A7, B1, A11, B1, A1, B1, A13
→ Row 42 [WS]: A13, B2, A21, B1, A3
← Row 43 [RS]: A40
→ Row 44 [WS]: A40
Square 7
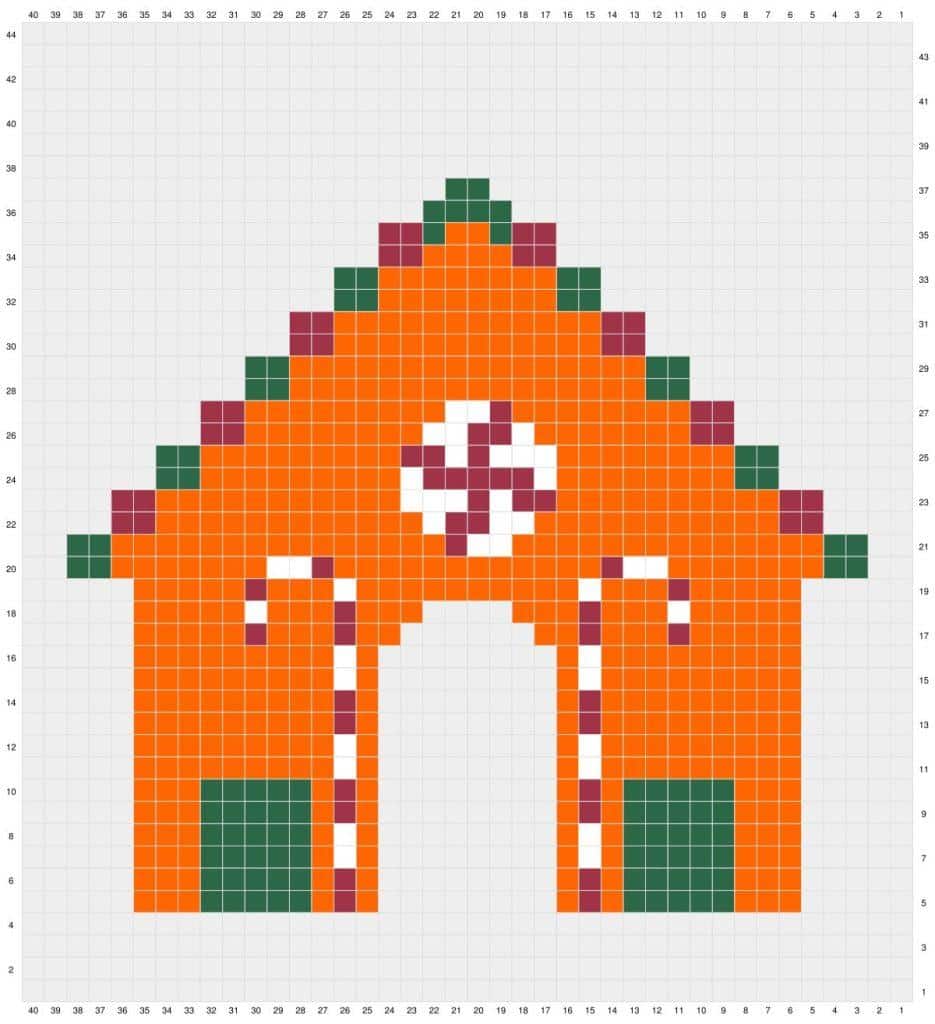
Gingerbread House Crochet Pattern
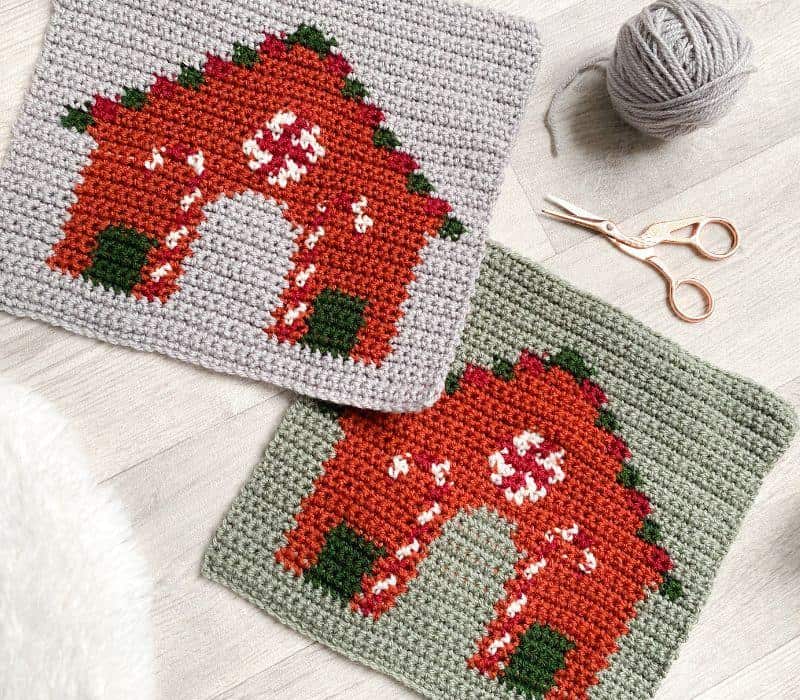
Tips for this square: there are lots more changes in this square so I recommend using bobbins for most of the sections. Go with your preference, but below are my suggestions. Make 2 to follow written layout and yardage.
- From Row 5 onwards, use 3 separate bobbins for the base colour, 2 for the orange of the house, and 2 for the green windows.
- For the candy canes take a separate length of yarn for each section of red/white, of 9/10″ or about as long as your forearm!
- Same as above for the red/green tiles of the roof
- The candy centre circle, you could keep the separate bobbins in orange and carry the red/white yarn under the other, containing those colours to just the centre. Or, carry the orange yarn under the white/red as well. This will make the section a little thicker than the rest but I didn’t find it too noticeable.
- Keep the base colour as separate bobbins until the roof is complete at row 37
- There will be lots of ends for this square, consider using knots and maybe a bit of fabric glue for the shorter ends if, like me, you don’t enjoy the ends!
Row 1: ch41, sc in the 2nd ch from the hook and each ch to the end, Ch1 and turn at the end of this row and every other row below.
→ Row 2 [WS]: A40
← Row 3 [RS]: A40
→ Row 4 [WS]: A40
← Row 5 [RS]: A5, B3, C5, B1, E1, B1, A8, B1, E1, B1, C5, B3, A5
→ Row 6 [WS]: A5, B3, C5, B1, E1, B1, A8, B1, E1, B1, C5, B3, A5
← Row 7 [RS]: A5, B3, C5, B1, D1, B1, A8, B1, D1, B1, C5, B3, A5
→ Row 8 [WS]: A5, B3, C5, B1, D1, B1, A8, B1, D1, B1, C5, B3, A5
← Row 9 [RS]: A5, B3, C5, B1, E1, B1, A8, B1, E1, B1, C5, B3, A5
→ Row 10 [WS]: A5, B3, C5, B1, E1, B1, A8, B1, E1, B1, C5, B3, A5
← Row 11 [RS]: A5, B9, D1, B1, A8, B1, D1, B9, A5
→ Row 12 [WS]: A5, B9, D1, B1, A8, B1, D1, B9, A5
← Row 13 [RS]: A5, B9, E1, B1, A8, B1, E1, B9, A5
→ Row 14 [WS]: A5, B9, E1, B1, A8, B1, E1, B9, A5
← Row 15 [RS]: A5, B9, D1, B1, A8, B1, D1, B9, A5
→ Row 16 [WS]: A5, B9, D1, B1, A8, B1, D1, B9, A5
← Row 17 [RS]: A5, B5, E1, B3, E1, B2, A6, B2, E1, B3, E1, B5, A5
→ Row 18 [WS]: A5, B5, D1, B3, E1, B3, A4, B3, E1, B3, D1, B5, A5
← Row 19 [RS]: A5, B5, E1, B3, D1, B10, D1, B3, E1, B5, A5
→ Row 20 [WS]: A2, C2, B7, D2, E1, B12, E1, D2, B7, C2, A2
← Row 21 [RS]: A2, C2, B14, D2, E1, B15, C2, A2
→ Row 22 [WS]: A4, E2, B12, D1, E2, D2, B11, E2, A4
← Row 23 [RS]: A4, E2, B10, E2, D1, E1, D3, B11, E2, A4
→ Row 24 [WS]: A6, C2, B9, D1, E5, D1, B8, C2, A6
← Row 25 [RS]: A6, C2, B8, D3, E1, D1, E2, B9, C2, A6
→ Row 26 [WS]: A8, E2, B8, D2, E2, D1, B7, E2, A8
← Row 27 [RS]: A8, E2, B8, E1, D2, B9, E2, A8
→ Row 28 [WS]: A10, C2, B16, C2, A10
← Row 29 [RS]: A10, C2, B16, C2, A10
→ Row 30 [WS]: A12, E2, B12, E2, A12
← Row 31 [RS]: A12, E2, B12, E2, A12
→ Row 32 [WS]: A14, C2, B8, C2, A14
← Row 33 [RS]: A14, C2, B8, C2, A14
→ Row 34 [WS]: A16, E2, B4, E2, A16
← Row 35 [RS]: A16, E2, C1, B2, C1, E2, A16
→ Row 36 [WS]: A18, C4, A18
← Row 37 [RS]: A19, C2, A19
→ Row 38 [WS]: A40
← Row 39 [RS]: A40
→ Row 40 [WS]: A40
← Row 41 [RS]: A40
→ Row 42 [WS]: A40
← Row 43 [RS]: A40
→ Row 44 [WS]: A40
Joining & Border
The last step!
Block your squares if required. I suggest pinning squares to the same size and shape (approx 10″), lightly spray with water and leave to dry.
To join the squares, follow the layout below (or your own!) and use a whip stitch.
For the border, work 160sc in each side of the finished blanket. This will mean 40sc from 1sc in each st of each individual square and evenly spacing out 40sc in throughout the side of the rows of each individual square (a few rows will need to be skipped as there are 44).
Finally, work a second row of sc in each sc from the previous row.
Finished!